Thursday, May 28, 2020

Mechanical Properties of Material | QSQTECH.COM

Mechanical Properties of Material:

Hello friends,
Today, we are discussing on Mechanical properties of material. It is very necessary for us to understand mechanical properties of material.
It is important to understand the mechanical properties of material because it shows us the use of the material. We also get information about which material can be used for our work.

There are some important mechanical properties of material.

Elasticity:

Elasticity is the property of material that when we apply a load to pull or press the material, and when it changes its shape. After removing the load, if it regains its shape, it is called the elastic property of the material. Like rubber that we pull and then release it comes to its original position, so we call it elastic material. But steel is high elastic material. 

Elasticity


Plasticity:

Plasticity is the property of material that when we apply a load to the material, and when it changes its shape. After removing the load, if it is not regains its shape, it is called the plasticity. 
Elasticity is followed by a limit, which is the elastic limit. The material is then converted to plasticity. 

Plasticity

Ductility:

It is the property of material that when material can be pulled by applying force which can be converted into wire, that material is called ductile material. This property of material is called ductility. 
Copper is a good example of ductile material. Copper is used for making wires. 

Ductility

Brittleness:

Lack of ductility is called brittleness. 
Material that does not have ductility is called brittle material. Like if we pull the glass, it suddenly breaks.
Cast iron is a good example of brittle material.

Malleability: 

When we convert a material to a thin sheet, it is due to the material's malleability. 
In ductility, we pull the material at a single point and in malleability, when we crushed the material at different points, it is converted into thin sheets. This is called the malleable property of material.  This property is also called malleability. 

Malleability

Hardness

It is the property of material that resists the penetration or indentation from another part is called hardness. In Hardness Testing Machine, when we check the hardness of a material, a pin point of the machine indents and penetrates that material, after that we saw the amount of material that the pin enters. This refers to the hardness of the material. If the pin enters the material slightly, the material is equally hard. For example- Glass is a hard material. 

Hardness testing machine.


    Toughness:

    It is the property of material that makes the material tough. The tough material means that the material doesn't break when we apply a sudden load or shock on it. We consider hardness and toughness to be the same. But the difference is that the tough material can bear the sudden load applied to it and hard material which cannot bear the sudden load and breaks.


    You will understand this hopefully.
    Thank you.

    Some of related questions that helps to enhance your basic knowledge and you would like to understand. 

    Thursday, May 21, 2020

    How to Manage your Manufacturing Operations Post Lockdown

    How to Manage your Manufacturing Operations Post Lockdown

    Manage your manufacturing operations.

    It seems that due to the COVID-19 pandemic, the restart button of all the Entrepreneurs of the world has been pressed. This disease has brought one country, not two countries, almost all countries, or shall I say the whole world is lined up in one place. Economic crisis has come in all over the world. Now the economy has no idea when it will exit the effect of COVID-19. Now it is time to least expect from your own company or employees and from the customers. It is time that the organization has got the opportunity to recognize its capabilities and discover a workable scope.
    Here are some possible ways that you can read explain, what your opinion is?

    Quality: 

    Each company is dependent on its own different production processes. Quality is of particular importance in these production processes. If the quality of the processes are not right, then issues from internal and customer start coming up. There are some root causes of these issues that effect the company internally and the company's customer. Every quality problem has some root cause. But delivery is given more priority that quality after production processes. Now after long time of lockdown, stocked goods will get dusty or dirty.
    This is to say that it is now mandatory to concentrate quality with delivery. The customer will also have the expectation of having good quality goods with less inventory. There will be no scope for taking goods of poor quality.
    You should understand the complexity and importance of SPC data collection monitoring in real time.
    Preventive action is better than corrective action. 

    Reduce wastage:

    It is well known that the cost of materials cannot be reduced, nor it can be advised to buy inexpensive materials. Before consuming stationary, raw materials, electricity, or any other materials, it would be corrected to take the suggestions from top management to shop floor associates. To save these materials,  reduce purchases and improve cash flow, it is important that we look for opportunities. Do we have the ability to set a target of 2% to 5% or more for our organization in material wastage.

    Low cost automation:

    You know that different types of issues are generated in manual operation, so we should form a task force team for low automation. So that manual operation can find issues. Tackle the team with one challenger at a time. We can also pre planning challenges in advance.

    Innovation in organization: 


    Now the time has come to bring innovation. Every company dreams of using their energy, time and efforts to innovate. But due to lack of time, it is not complete. But now the time has come that we can improve our efficiency, productivity, better way of production, improvement in yield, etc.

    Planning:

    It is necessary to plan for improvement. If we do something and don't plan for it, there is very little chance of success in it. Planning is the process of thinking about the necessary activities in which we plan step by step an achieve their intended goal. For example: when we do APQP, planning is a very important role in this.

    Awareness Training on COVID-19 and Social distancing: 

    We will introduce our employees very well to social distancing & COVID-19 and tell them how to survive this disease while working. We have to make proper rules for a long time due to this disease. For this, we have to make a schedule of daily training.
    So that, the company's employees and manufacturing processes are not affected.


    We have to tell our employees about its symptoms and pay attention to their social distances.

    You will understand this hopefully.

    Thank you.

    Some of related questions that help to enhance your basic knowledge and you need to know.


    Thursday, May 14, 2020

    3M (Muda, Mura, Muri) | Discuss on types of waste | QSQTECH.COM

    3M (Muda, Mura, Muri)

    Hello friends, 
    Today, We'll discuss on 3M concept. Hopefully, you'll understand this topic.
    First of all, thanks for visiting.
    Now, below topics that are covering today.
    • HISTORY 
    • TYPES OF WASTE
    • TYPES OF ACTIVITIES 
    • 7+1 FORMS OF MUDA.

    3M image

    HISTORY:

    After ww2 Toyota was almost bankrupt. 
    • Postwar, demand was low and minimizing the cost per unit through economics of scale was inappropriate. This led to the development of demand led full systems.
    • The Japanese could not afford the expansive mass production facilities of the type used in the U.S.A so they instead focused on reducing waste and low cost automation. 
    • Likewise, Toyota couldn't afford to maintain high inventory level.
    • The Toyota production system was developed a time when Toyota needed to do more with less on flexible lines and reduce the time from order to delivery to get paid quickly.
    • The emphasis was on reducing the timeline by eliminating anything that didn't add value to the product eliminating waste.
    • Lean principle was an outcome of study of TPS (Toyota Production System).

    Lean principle: 

    Lean focused on eliminating waste and constantly reducing the cycle time. As the waste is eliminating, quality improves while the cycle time of process and the cost are reduced.

    TAICHI OHNO is founder of Toyota Production System.
    He defined the 7 types of muda.
    He says that, all we are doing is looking at timeline from the moment of customer gives us an order to the point, when we collect the cash,and we are reducing that timeline by removing the non value added wastage.
    Originally, Toyota Production System was called "Just In Time” production system which is popularly known as a lean manufacturing process.

    TYPES OF WASTE:

    There are 3 types of waste.

    1. MUDA
    2. MURA
    3. MURI
    3M

    1. MUDA: 

    It is a Japanese term that means waste. Any activity that doesn't add value. It only consumes time & cost.

    There are two types of MUDA.
    TYPE-1 MUDA: It includes non-value added activities in the processes that are necessary for the end customer. As a result, it can be minimized. E.g.  Inspection. 

    TYPE-2 MUDA: It includes non-value added activities in the processes that are unnecessary for the customer. As a result, it should be eliminated.
    E.g. — Rework.

    TYPES OF ACTIVITIES:

    There are two types of activities. 
    1. Value added activity 
    2. Non value added activity 

    1.  Value added activity: 

    This is the activity that transfers the product in such a form for which the customer pays us.

    2. Non-value added activity:

    This is an activity that doesn't add any value to the product and the customer doesn't pay for it either. 
    We do value added activity 10% and non-value added activity we do 90%.

    Non-value added activity is of two types.
    1. Necessary waste
    2. Pure waste

    1. Necessary waste:

    This is the activity that is necessary to run a business but can minimize it. Such as, inspection which doesn't add value but is necessary to prevent defect outflow from our end to customer, and it also maintains quality. 

    2. Pure waste: 

    This is an activity that only consumes resources but doesn't add any value to the product. It is not needed by the organization  nor does the customer pay for it. Such activities should be eliminated. Like- Inventory, wait time, rework, excess check.

    7+1 FORMS OF MUDA:

    1. Defect
    2. Overproduction 
    3. Waiting 
    4. Non-utilized talent (New)
    5. Transportation 
    6. Inventory 
    7. Motion
    8. Extra processing 
    In all these form of muda, Non utilized talent is that was later develop. It is developed by Toyota Production System (TPS).

    1. Waste of Defect/Repair/Reject: 

    Rejection or scrap generated for not being able to produce a quality product in the first place is called a defect. Due to the production of scrap, the material which is scrap, is checked, rework or segregation and repair. The cost is fixed. it is called waste of defect.

    2. Waste of overproduction: 

    Creating a product excessively or prerequisite and without the need of the customer is called overproduction. Overproduction is the worst waste of everyone else.

    3. Waste of waiting:

    Waiting of the operator due to delay between an operation or the machine being stuck for some reason or the machine being busy, is called waiting. 

    4. Waste of non-utilized talent:

    The company's most important resources are its own employees. Not being able to use the right time and talent of its employees is waste of non-utilized talent. For example- Putting technician in paperwork. Problem solving only by the experts. Do not include everyone in suggestions and improvements. 

    5. Waste of tranportation:

    Any unnecessary movement of material, people, information, or supplies between process that is not required for 'just in time' production service. It also creates an opportunity for damage to occur.
    For example- Transportation of cheaper component from one country to another. 

    6. Waste of inventory: 

    Excess parts, materials or work in process that is not being used.

    7. Waste of motion: 

    Any motion of people or machine that does not add value to the product or process.

    8. Waste of extra processing:

    Over processing is putting more into the merchandise than is valued by the customer.


    2. MURA : 

    It means unevenness, uniformity & irregularity.
    Any activity that does not add value.
    Unlevel workloads on people & machine.

    3. MURI : 

    It is the Japanese term for overburden.
    It means strenuous conditions for both workers and equipment as well as for the work process.

    We hope you will understand this topic.

    Thank you.

    Some of related questions that help to improve your basic knowledge and you need to know.

    Thursday, May 7, 2020

    Micrometer | How to take readings from micrometer? | QSQTECH.COM

    Micrometer

    Micrometer image

    Micrometer is a measuring instrument which is used for measurement of length, diameter, depth, and thickness, etc. 
    It is a tool used to measure parameters in engineering colleges, workshops, and manufacturing companies. These are in different ranges to measure different parameters.
    For example — 0-25 mm, 25-50 mm, 50-75 mm etc.
    It is also known as screw gauge. It's least count is generally 0.01 mm. 
    It works on the principle of a nut and bolt. 

    Why did its necessity? 

    This is a very precise instrument. It can take readings in the order of micrometers. It is also a more precise instrument than Vernier Caliper. With this we can also measure very low values accurately. That's why, micrometer was needed here.

    It is mainly of two types:
    1. Manual micrometer 
    2. Digital micrometer 
    Parts of manual micrometer. 
    • Anvil 
    • Spindle 
    • Lock nut 
    • Main scale / Sleeve 
    • Frame 
    • Circular scale 
    • Thimble 
    • Ratche

    Constants of Micrometer

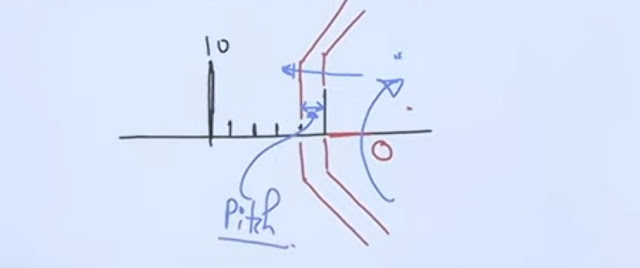
    Pitch: 

    Pitch is the linear distance advances by the head scale over the main scale. 
    It is the linear distance covered by the circular scale in one rotation. 

    Pitch (Micrometer)

    As shown in picture, 
    First, our circular scale was at zero. When, we rotated the circular scale in clockwise direction. Then it went ahead by advance, and after that,  generally, it reached one division ahead. When the circular scale moves one division, the distance which is shown in picture is called pitch. 
    If the screw advances by 5 mm for 10 rotations of the cap, then the pitch = 5/10
    = 0.05 mm.

    Least count: 

    The minimum measurement of length is equal to on division on the head scale which is equal to the pitch divided by the total circular scale division. Thus, in the aforesaid illustration, if the total circular scale division is 100,
    then, the least count = 0.5 / 100 = 0.005 mm

    Formula of Least count = pitch / Number of division of circular scale

    How to take reading? 

    Micrometer

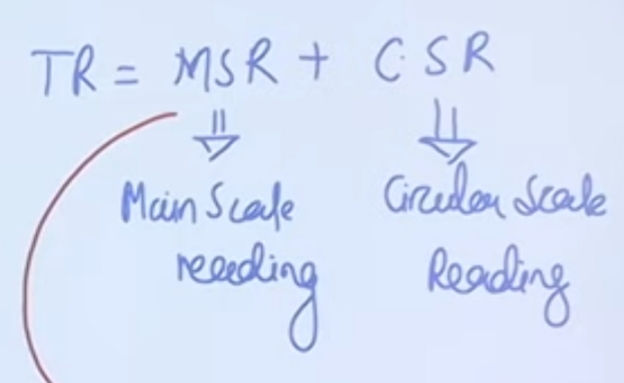
    Total readings = MSR + CSR, 

    MSR= Main scale readings 
    CSR = Circular scale readings 

    Formula in constants of micrometer

    Main scale readings (MSR) : 

    It is the last mark of main scale before cap (head) of circular scale visible to us. 

    Circular scale readings (CSR) : 

    It is multiplication of CCSD and least count.
    CSR = CCSD × Least count,

    CCSD : 

    It is mark of circular scale which is exactly coincide with the reference line of main scale. 
    Coincide with circular scale (micrometer)

    For example: 10 rotations of the cap of a screw gauge is equivalent to 5 mm. Find the least count. The cap has 100 divisions. A reading taken for the diameter of a wire with the screw gauge shows four complete rotations and 35 divisions on the circular scale. Find the diameter of the wire. 

    Here, 
    10 rotations = 5 mm 
    1 rotation = 5/10 = 0.5 mm 
    Pitch = 0.5 mm 

    Given, 
    Number of circular scale division= 100 

    Now, 
    Least count = Pitch / Number of circular scale division 
    Least count = 0.5 / 100 = 0.005 mm 

    We will find out the diameter of the wire. 
    MSR = 4 rotations × pitch, 
    MSR (Main Scale Reading) = 4 × 0.5 mm 
    = 2 mm 

    CSR = CCSD × Least count, 
    Here given, CCSD = 35 × 0.005 = 0.175 mm 

    Now, Diameter = MSR + CSR 
    Diameter = 2 + 0.175 = 2.175 mm 

    We hope you will understand this topic.

    Thank you.

    Some of related questions that help to improve your basic knowledge and you need to know.


    Clamping force | How to calculate the clamping force in injection molding machine | Qsqtech.com

     CLAMPING FORCE:  Clamping force is an engineering term used in mechanical and manufacturing processes. The meaning of clamping force is to ...